how to draw spiral stairs in autocad 3d
X
To Create a Screw Stair With User-Specified Settings
AutoCAD Architecture 2018, & AutoCAD MEP 2018
By: ![]()
Help
Utilize this procedure to create a circular sweeping and spiral stair. A screw stair revolves near a common heart point from bottom to top.
You can specify a radius directly or on the screen only when the arc constraint is free. Otherwise, the radius is determined from the specified tread length and arc constraint. In that example, you lot need to adjust the tread length to accomplish the desired radius.

Creating a spiral stair
To create a spiral stair with the specified tread depth (T) that occurs at a specified distance from the inner edge, start construct the stair with a width equal to twice the required distance (A). Next, use Customized Edges to offset the outer edge to the desired full width B. The commencement distance is equal to B - 2A.
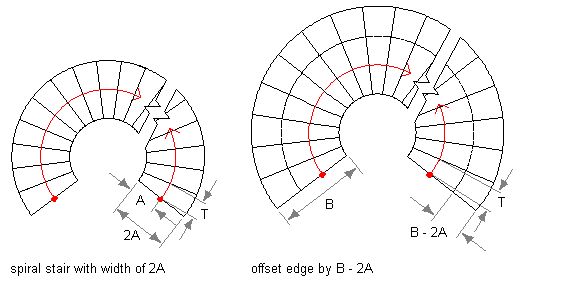
Creating a spiral stair with a specified tread depth at a specified distance
Tip: To ensure that the Backdrop palette is displayed before y'all select a tool, click  Properties.
- Open the tool palette that you lot want to use, and select a stair tool.
If necessary, scroll to brandish the tool that you want to use.
Notation: Alternatively, click
. 
- On the Properties palette, click the Design tab, expand Basic, and aggrandize General.
- Select a style.
- For Shape, select Spiral.
- Specify the horizontal orientation of the stair:
If you desire to… And so… draw the screw stair in a counterclockwise management select Counterclockwise for Horizontal Orientation. describe the screw stair in a clockwise direction select Clockwise for Horizontal Orientation. 
Specifying the horizontal orientation for a spiral stair
- Specify the vertical orientation of the stair:
If you want to… Then… draw the stair from this floor to the floor above select Upwards for Vertical Orientation. draw the stair from this floor to the floor beneath select Down for Vertical Orientation. Note: If Cease with is set to Landing, the vertical orientation is up and cannot be changed.
- Aggrandize Dimensions.
- Specify stair width, summit, and justification:
If yous desire to… And then… specify the width of the stair enter a value for Width. specify the floor-to-flooring height of the stair enter a value for Height. specify the justification of the stair enter a value for Justify. The Justify value you select controls the insertion betoken when y'all place the stair (within, middle, or exterior) at the beginning of the stair run. - Specify the stair termination:
If you want to… And then… finish the stair run with a riser select Riser for Terminate with. 
Note: Stairs that end with a riser will have an overall height that is i tread thickness less than the floor-to-floor height specified.
terminate the stair run with a tread select Tread for Terminate with. 
end the stair run with a landing select Landing for Terminate with. 
Notation: If the vertical orientation is set up to Downwardly, Finish with is set to Riser and cannot exist changed.
- Specify the radius of the stair:
If you desire to… Then… specify the exact radius for the spiral stair select No for Specify On Screen and enter a value for Radius. define the radius for the stair dynamically select Yes for Specify On Screen. - Select the blazon of arc constraint to use when creating the screw stair:
If y'all desire to… Then… create a spiral stair run with no constraints select Free for Arc constraint. create a spiral stair with a specific number of degrees for the stair flight select Full degrees for Arc constraint, and enter a value for Arc angle. This includes the last landing or tread. create a spiral stair with a specific degree for each tread in the stair select Degrees per tread for Arc constraint, and enter a value for Arc angle. - Click
 next to Calculation rules, and
 if y'all desire to… then… specify the overall linear length of the stair enter values for Directly Length and Riser Count, so click OK. - When Directly Length is set to
 (automated), the value is calculated based on the tread size and riser count.
 - When Straight Length is set to
 (user-defined), the stair length is equal to the dimension entered, and the other three values are adjusted inside the code limits.
 - When Riser Count is set to (user-defined), the tread depth is increased or decreased to accommodate the stair.
specify the full number of stair risers enter a value for Riser Count, then click OK. - When Riser Count is set up to (automated), the number of risers is based on the overall length and overall peak of the stair and the code limits specified on the Pattern Rules tab. The Straight Length value of the stair is adapted automatically.
- When Riser Count is set to (user-defined), you can specify a value that is used to calculate the tread depth and riser height. If these values fall outside the stair limits, an error bulletin is displayed.
specify the height of each riser in the stair flight gear up all fields to (automatic), click the icon for Riser to change information technology to (user-divers), and enter a value for Riser. Click OK. specify the tread depth for each tread in the stair flight gear up all fields to (automatic), click the icon adjacent to Tread to alter it to (user-divers), and enter a value for Tread. You tin also specify the Riser count when you set up the tread depth. Click OK. Note: If a value is set to user-defined on the Adding rules worksheet, it can be modified directly in the Backdrop palette.
Notation: If
 is displayed next to a field in the Adding Rules dialog box, that field can't be changed until another field is changed from (user-defined) to (automatic).
 - When Directly Length is set to
- Aggrandize Advanced.
- Specify the Flooring Settings:
If you want to… Then… alter the thickness of the floor terminate material at the top of the stair enter a value for Top outset. alter the depth of the construction at the top of the stair enter a value for Height depth. modify the thickness of the flooring finish material at the bottom of the stair enter a value for Bottom offset. - Set the minimum height or amount of risers in a stair flying, or specify *NONE*.
- Prepare the maximum height or number of risers in a stair flight, or specify *NONE*.
- Specify the center point for the spiral stair.
- Specify the location of the stair.
- Go on calculation stairs, or printing Enter.
Post a question. Get an answer.
Go answers fast from Autodesk support staff and production experts in the forums.
Source: https://knowledge.autodesk.com/support/autocad-architecture/learn-explore/caas/CloudHelp/cloudhelp/2018/ENU/AutoCAD-Architecture/files/GUID-DE51B26D-48B2-40C3-9E81-6BDE3DD0605A-htm.html
0 Response to "how to draw spiral stairs in autocad 3d"
Post a Comment