unity 3d grass draw distance
Hey y'all! Today, I want to evidence y'all how I made this wavy grass shader in Unity. The lighting is a uncomplicated cel shader, which I covered in a post on cel shading, and then we're going to focus on the vertex animation that creates the wave!
Shout-out to this Low-Poly Foliage asset pack, which is where I got the grass models from.
I took a chip of feedback from the Reddit posts I fabricated about this web log! Redditor aramanamu had some great suggestions, a couple of which I got several times, then I decided to implement them in this post:


I hope this is what yous were looking for! I highlighted code comments in orangish, and I included in-progress screenshots for every step of this tutorial. ^^
If you have feedback about these tutorials, don't exist afraid to PM me on Reddit, contact me on Twitter, or annotate on this post ❤
For your reference during the tutorial, here's the final lawmaking for this shader, nether an open up-source licence:
-> Link to final code for Unity Grass Moving ridge Shader
Now, on with the tutorial!
Overview
In summary: the animation is accomplished in the vertex shader by sampling a gradient texture based on the x,z world position of the vertex, and using that sample value to move the 10,z position of each vertex. The sample position is scrolled with time, which gives the ripple issue to the vertex move. In addition, to forbid the base of the grass from moving, the animation speed is modified by the vertex y-position.
The gradient texture looks like this:

As you lot can see, it has different RGB values at each pixel on the texture. When we map each pixel to a earth position, we'll get dissimilar output per position. That output is used to change the speed of the vertex animation. And then, by scrolling our sample position over fourth dimension, our output volition modify, giving the ripple effect.
Let's break this downward into vi steps:
- Go normalized vertex world position
- Scroll sample position based on time
- Sample the gradient texture & modify vertex position based on sample
- Modify animation amount based on vertex superlative
- Apply lighting in the fragment shader
1. Go normalized vertex world position
We're going to sample a wind texture to modify the speed of the vertex blitheness, using each pixel color in the air current texture to become a speed for the blitheness to move at.
However, since I used private meshes for each grass model, I can't merely sample the current of air texture based on the local position of the vertex. That local position doesn't give usa enough information to move a ripple throughout the whole field of grass.
So, we'll demand to sample the globe position and map that to a position on the gradient texture. To do that, we first normalize the world position – convert it to a value from 0 to i, where 0 is the 'farthest left' border of the earth, and 1 is the 'uttermost correct' edge of the earth.
To normalize the position, we first need to know what the bounds of the earth are. For the best results, make your bounds well-nigh the size in globe coordinates of your field of grass. I made the bounds a Property so that I could edit them in the inspector for the cloth.
Here's what the world size looks like under the Properties{} tag:
_WorldSize("Globe Size", vector) = (1, one, 1, 1) And here'south how to compute the normalized world position:
// go vertex world position float4 worldPos = mul(input.vertex, unity_ObjectToWorld); // normalize position based on world size float2 samplePos = worldPos.xz/_WorldSize.xz;
To examination this position, let'south shop information technology in our vertex shader output and and then use information technology in the fragment shader to color the grass based on the normalized world position.
Here's what that looks similar in the vertex shader:
// test sample position output.sp = samplePos; I color the grass from black->red based on the increasing x-value of the position. The fragment shader code looks like this:
float4 frag(vertexOutput input) : Colour { return float4(input.sp.x, 0, 0, i); } If your sample position is accurate, yous should get a shine gradient from dark red to vivid red, looking something like this:

2. Curl sample position based on time
To give the ripple effect, we want to motion our sample position over time. Since nosotros're sampling a smooth gradient texture, this will give the event of the moving ridge changing speed with ripples of wind.
Firstly, we need to add a new Property to define the speed of the scrolling, which is essentially the speed of the "wind":
_WindSpeed("Air current Speed", vector) = (1, 1, 1, i) In our vertex shader, we demand to add together merely one line in order to curl the sample position (bolded below):
// get vertex earth position float4 worldPos = mul(input.vertex, unity_ObjectToWorld); // normalize position based on world size float2 samplePos = worldPos.xz/_WorldSize.xz; // roll sample position based on time samplePos += _Time.x * _WindSpeed.xz;
(Read up on what Time.x means hither. Basically, it's but Time/20, which is a small value, and so I made _WindSpeed large.)
Now, in our fragment shader, nosotros need to take the frac() value of the sample position in social club to correctly test the value.
Why? Because adding Fourth dimension to the samplePos will cause it to grow exterior the bounds of 0-1, which doesn't give us an accurate color value, equally color values should exist between 0-one. Frac() takes the fractional component, or the value of the input after the decimal point, which keeps it betwixt 0-one and loops it dorsum around to 0 after it's passed 1. Read the CG documentation on Frac here.
float4 frag(vertexOutput input) : Color { return float4(frac(input.sp.x), 0, 0, 1); } At present, when you run the game, you should come across the ten-value of the sample position scrolling and looping with time, like and so:

3. Sample the gradient texture & alter vertex position based on sample
Now, we're going to utilise that sample position to sample the gradient texture.
Firstly, yous'll need to create a gradient texture which blends perfectly on the left and right edges of the texture. We're going to use this gradient to change the speed that the grass is animative.
The perfect blending on the left-to-right edge is VERY important. See how in the above gif, the x-value has a difficult edge at 0 and one? If your gradient doesn't blend perfectly at those values, you'll become weird jittering at that edge of the blitheness.
Here's the texture I used once more:
Since we already normalized the earth position value, sampling is simple. Here'south how we sample the slope texture based on our sample position.
float windSample = tex2Dlod(_WindTex, float4(samplePos, 0, 0));
windSample is now a value between 0-1 based on the pixel colour at the sample position of the texture. We're going to use that sample value to translate the vertex position of the grass.
We'll demand two new Properties to control the speed and amplitude of the animation:
_WaveSpeed("Moving ridge Speed", float) = i.0 _WaveAmp("Wave Amp", float) = 1.0 At present, in the vertex shader, nosotros're ready to utilize the wave animation to the x and z position of the verticies.
As we saw in the concluding step, samplePos is increasing with time, and therefore volition increase exterior of the 0-1 bounds. To keep the value from continually increasing throughout the lifetime of the game, I use a trig part to loop the value back around.
Here'south what our whole vertex shader looks similar then far (new parts bolded):
// get vertex world position float4 worldPos = mul(input.vertex, unity_ObjectToWorld); // normalize position based on world size float2 samplePos = worldPos.xz/_WorldSize.xz; // scroll sample position based on time samplePos += _Time.ten * _WindSpeed.xz; // test sample position output.sp = samplePos; // apply moving ridge animation output.pos.z += sin(_WaveSpeed*windSample)*_WaveAmp; output.pos.x += cos(_WaveSpeed*windSample)*_WaveAmp;
If your vertex shader works, your output should await something like the gif below! Y'all'll almost certainly need to fiddle with _WaveSpeed and _WaveAmp to become it to look expert.

iv. Change animation amount based on vertex height
You probably noticed that the WHOLE grass object is moving in the to a higher place gif, and that doesn't wait very realistic! In reality, the base of the grass that's attached to the footing doesn't movement. In addition, any plant waving in the wind is usually bendier the further away information technology is from its root.
Notice how, in this picture, the tiptop of the plant has diddled much further away from its base than parts of the constitute closer to the base:
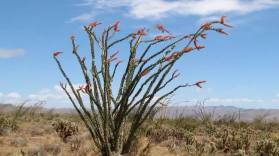
And then, to simulate that in our grass, we're going to alter the blitheness based on the vertex height.
Showtime of all, we don't want the base of the establish to move at all. To do that, permit's create a float called heightFactor, and multiply our animation by it. If the y-position of the vertex is below some arbitrary _HeightCutoff value, then heightFactor should be 0. Then, if nosotros multiply the animation by a 0 heightFactor, information technology'll abolish any blitheness.
Showtime, we need to add the _HeightCutoff to our properties:
_HeightCutoff("Height Cutoff", float) = 1.0 And then, we need to compute heightFactor and multiply our animation by it:
// 0 animation below _HeightCutoff // heightFactor will either exist 0 or 1 float heightFactor = input.vertex.y > _HeightCutoff; // apply wave animation output.pos.z += sin(_WaveSpeed*windSample)*_WaveAmp * heightFactor; output.pos.10 += cos(_WaveSpeed*windSample)*_WaveAmp * heightFactor;
Now, allow'due south make the animation stronger the higher the vertex is. To do this, nosotros'll need another new belongings called _HeightFactor, and we'll apply that to our heightFactor value. I used the prisoner of war() function in social club to brand the animation exponentially larger with the increasing y-value.
heightFactor now returns a value that's either 0 OR the value of y^(_HeightFactor):
// 0 animation beneath _HeightCutoff float heightFactor = input.vertex.y > _HeightCutoff; // make animation stronger with acme heightFactor = heightFactor * pow(input.vertex.y, _HeightFactor); // apply wave animation output.pos.z += sin(_WaveSpeed*windSample)*_WaveAmp * heightFactor; output.pos.ten += cos(_WaveSpeed*windSample)*_WaveAmp * heightFactor;
If you lot've got this all working, your animation should now look something like this. Again, you'll probably need to fiddle with _HeightFactor to make it look reasonable:

5. Utilise lighting in the fragment shader
Woohoo! If yous've made it this far, you've gotten through the hard part of the tutorial. Yous've successfully animated the grass!!!
I already wrote a tutorial on cel shading, so I'm not going to get in-depth here on how information technology works. Instead, let'south only wait at what the complete vertex and fragment shaders look similar with the lighting included.
Firstly, add the camera prune space vertex position and the world infinite normal position to your vertex output:
vertexOutput vert(vertexInput input) { vertexOutput output; // convert input to clip & world space output.pos = UnityObjectToClipPos(input.vertex); float4 normal4 = float4(input.normal, 0.0); output.normal = normalize(mul(normal4, unity_WorldToObject).xyz); // get vertex world position float4 worldPos = mul(input.vertex, unity_ObjectToWorld); // normalize position based on world size float2 samplePos = worldPos.xz/_WorldSize.xz; // scroll sample position based on time samplePos += _Time.ten * _WindSpeed.xy; // sample air current texture float windSample = tex2Dlod(_WindTex, float4(samplePos, 0, 0)); // 0 animation below _HeightCutoff float heightFactor = input.vertex.y > _HeightCutoff; // make animation stronger with height heightFactor = heightFactor * pow(input.vertex.y, _HeightFactor); // apply wave blitheness output.pos.z += sin(_WaveSpeed*windSample)*_WaveAmp * heightFactor; output.pos.x += cos(_WaveSpeed*windSample)*_WaveAmp * heightFactor; return output; } And finally, apply lighting in the fragment shader. Y'all'll need a ramp texture, like the one I'm using below, and a new Property for the base color of the grass. (Note that _WorldSpaceLightPos0 and _LightColor0 are provided by Unity.)

Basically, this shader uses the dot production between the low-cal direction and the vertex surface normal to sample the ramp texture.
float4 frag(vertexOutput input) : Color { // normalize low-cal dir float3 lightDir = normalize(_WorldSpaceLightPos0.xyz); // apply lighting float ramp = clench(dot(input.normal, lightDir), 0.001, i.0); float3 lighting = tex2D(_RampTex, float2(ramp, 0.5)).rgb; float3 rgb = _LightColor0.rgb * lighting * _Color.rgb; render float4(rgb, 1.0); } In that location you go! Your complete shader, with lighting and color applied, should look something like the last gif beneath!

Fin
Woohoo! I hope yous learned a lot from this tutorial. We covered texture sampling, vertex animation, the frac() part, and lots of math techniques!
Here'due south the full code once again, under an open-source license.
If y'all have any questions virtually writing shaders in Unity, I'm happy to share as much as I know. I'g not an expert, but I'g always willing to aid other indie devs 🙂 And do give me feedback about the tutorials, I love hearing from y'all!
Adept luck,
Lindsey Reid @so_good_lin
PS, here'due south the Unity graphics settings for this tutorial.
Source: https://lindenreidblog.com/2018/01/07/waving-grass-shader-in-unity/
0 Response to "unity 3d grass draw distance"
Post a Comment